
A savory treat for Purim: sumac and cumin spiced roasted chick peas! Judging by the number of recipes for them on the Internet, roasted chick peas are downright trendy. It makes sense. Roasted chick peas are healthy -- naturally vegan, gluten-free, high in protein and fiber -- and they happen to taste delicious. We can all think of some ...
Savory Beef Hamantaschen

This post is sponsored by the Certified Angus Beef® brand in conjunction with a social media campaign through Sunday Supper LLC. All opinions are my own. Enjoy this recipe for Savory Beef Hamantaschen made with Certified Angus Beef®. Next month brings the Jewish festival of Purim, a carnival holiday where people are encouraged to dress in ...
Instant Pot Ropa Vieja

This post is sponsored by the Certified Angus Beef ® brand in conjunction with a social media campaign through Sunday Supper LLC. All opinions are my own. Enjoy this recipe for Ropa Vieja made with Certified Angus Beef ®. Are you a fan of Cuban food? I am. When we visit my mother in Florida, there is a little Cuban restaurant that we like to ...
Passion Fruit Curd
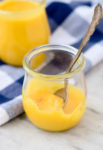
Have you ever worked with passion fruit? I will tell you all you need to know. If you have been watching "The Great British Baking Show" as much as I have, you've probably noticed that the contestants frequently bake with passion fruit. I have been astonished by how often passion fruit nectar or curd works its way into the cakes and desserts ...
Easy Beef Calzones for Dinner on the Go

Thank you Vanity Fair® Napkins for sponsoring this post. Take on everyday messes with Vanity Fair® Extra Absorbent Napkins! Because I am a cookbook author and food blogger, people assume that dinner at my house is an elegant affair. In my friends’ imaginations, my family sits down together at the dinner table, napkins in laps, and savors a ...
Instant Pot Beef and Ale Stew

This post is sponsored by the Certified Angus Beef ® brand in conjunction with a social media campaign through Sunday Supper LLC. All opinions are my own. December is such a busy time in my house with holiday concerts (for both kids!), end-of-the-year events, and, of course, holiday shopping. (My family celebrates Hanukkah but we also ...
How to Make Sufganiyot at Home

Feel empowered to tackle Israel's beloved Hanukkah treat, a jelly-filled doughnut called sufganiyot, at home! Most Americans, when they think of Hanukkah food, think of latkes -- crispy potato pancakes fried in oil and topped with either applesauce or sour cream depending on your personal predilections. (I'm Team Sour Cream, all the ...
Cranberry Curd Tart

Give cranberries a starring role in your holiday celebration with this stunning dessert: an elegant tart filled with luscious cranberry curd! A few years ago, I won a national food blogger recipe contest with this recipe for Cranberry Lime Curd. I was pretty chuffed about it, in part because the contest came with a generous cash prize, but ...
Radicchio and Roasted Squash Salad for Thanksgiving

Thanks to OXO for sponsoring this post with Thanksgiving recipes from the new cookbook Now & Again by Julia Turshen. Thanksgiving is a mere two weeks away which means that it is time to finalize your menu and gather all the recipes that you will need. This year, you may be tempted to try a new recipe or two, especially if you have seen ...
Pan-Seared Duck Breast with Plums

Thank you Decoy for sponsoring this post. Celebrate International Merlot Month this October by using the hashtag #MerlotMe on social! When you see a recipe, like this one, for duck, do you scoff and think: "Make duck? At home? No, that's too complicated. I might order duck in a restaurant, but that's not something I can cook." Well, think ...
Easy Peach Ice Cream (Egg-Free)

An easy-to-make peach ice cream with tons of fresh peach flavor and no egg yolks. Perfect for egg allergies or a quick DIY project! Having been without an oven for most of the summer, I have sorely missed baking. It's been killing me to go to the farmers market each week and see all the lovely summer fruit knowing that I can't turn any of it ...
Lime Ginger Peach Jam
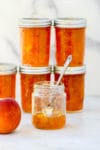
A beautiful peach jam with the tropical flavors of lime and ginger. Last week, I returned home to find a box of softball-sized white and yellow peaches on my doorstep. Can you imagine how exciting that is? This year, once again, I am serving as a Canbassador for the Washington State Stone Fruit Growers. which means that every so often, I ...
Kitchen Update: Week 10

The latest on our kitchen renovation. We have cabinets! We have countertops! I have not been updating you regularly on the status of our kitchen renovation because, to be honest, there were many weeks when progress was hard to see. Work in the walls -- plumbing and electrical -- took several weeks and while much was actually happening, it ...
How to Make Gazoz, Israel’s Favorite Homemade Soda

This shop has been compensated by Collective Bias, Inc. and its advertiser. All opinions are mine alone. #ToraniEndlessSummer #CollectiveBias Learn how to make gazoz, Israel's version of homemade soda, using Torani syrups, seasonal fresh fruit, herbs and sparkling water. Think summer is hot where you live? You know where it is really hot? ...
Visit to Victoria and Vancouver

With our kids at camp, my husband and I took a quick trip to Victoria and Vancouver, British Columbia. There is a lot to see and do (and eat) in this part of Western Canada! Living in Chicago, among the things I miss most are the mountains and the ocean. So, when planning a trip, if I can include some mountains and ocean views, all the ...
Easy Edamame Dip for Back-to-School Lunches

This shop has been compensated by Collective Bias, Inc. and its advertiser. All opinions are mine alone. #LunchesWithLove #PackedWithLove #CollectiveBias This back-to-school season, pack tasty and fun lunches like this edamame dip with Snyder's of Hanover pretzels and crunchy veggies! Don't kill the messenger, but back-to-school is only a ...
DIY Tartine Bar

This shop has been compensated by Collective Bias, Inc. and its advertiser. All opinions are mine alone. #EasySqueezy #CollectiveBias The open-faced sandwich is a classic of so many cuisines. In Italy they have bruschetta. In Scandanavia, smørrebrød is the name for slices of dark rye bread spread thick with butter and topped with meat, ...
How to Freeze and Use Cherries

July is peak cherry season! If your family loves cherries as much as mine does, why not freeze some of these beauties while they are in season and enjoy your favorite fruit all year long? If you enjoy eating or baking with sweet cherries, you know that these diminutve stone fruits are at their peak in July and August. While you can ...
Summer Soup and Salad with Vegan Corn Chowder

This is a sponsored conversation written by me on behalf of Danone. The opinions and text are all mine. For a refreshing, seasonal meal, try my summertime soup and salad combination with a vegan corn chowder and a simple green salad. If, like me, you want to adopt a more plant-based diet, summer is the best time to do it. With so many ...
How to Make Zhoug, Israel’s Favorite Spicy Chile Paste
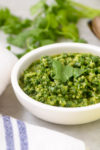
I received compensation from Alka-Seltzer® to write this post. All opinions are entirely my own. #MyFoodMoment #CollectiveBias As Middle Eastern food becomes more and more popular in the States, home cooks are learning that there is so much more to this cuisine than hummus and tabbouleh. Adventurous eaters are filling their pantries with ...
Kitchen Renovation: Week 2

We are halfway though the second week of our kitchen renovation. Last week, I started with the bad news: twelve weeks without a kitchen! This week, there is not really any new bad news. I still don't have a kitchen and I miss cooking and baking like crazy. But, we knew that already. In fact, not having any new bad news is actually good ...
Creamy Homemade Ricotta Cheese

This shop has been compensated by Collective Bias, Inc. and its advertiser. All opinions are mine alone. #UndeniablyDairy #CollectiveBias In my house, we are unabashed lovers of dairy foods. Whether it is the milk on my husband's morning cereal, the cheese on Zuzu and her friends' Friday night pizza, or the yogurt in JR's after-school ...
Kitchen Renovation: Week 1

I have some exciting news to share: we are renovating our kitchen! A little over two years ago, my family moved into a new (to us) house in our town. We loved the central location; the beautiful addition on the back of the house; and the spacious finished basement that was the perfect hangout for our kids and their friends now that they are ...
Mango Yogurt Smoothie Bowl

This shop has been compensated by Collective Bias, Inc. and its advertiser. All opinions are mine alone. #FreshCutSavings #CollectiveBias When the weather heats up, you are going to want to cool down with this super-easy Mango Yogurt smoothie bowl made with Odwalla 100% Juice Smoothies, ZICO Coconut water, plain Greek yogurt and fresh-cut ...
Easy Hors d’Oeuvres for an Outdoor Wine Tasting

Thank you Middle Sister for sponsoring this post. Bring your favorite Middle Sister wine along to all of your celebrations this year! Memorial Day weekend is the unofficial start of summer and I am officially opening up my backyard for business. I adore al fresco entertaining during the summer months and because our house sits across the ...